 YPPS develops customized apps for all mobile platforms. We will meet with you to determine your exact needs and develop your app from the ground up. Contact
 The YPPS BluePrint Team manages the Copier Rental Program and the PaperCut Program, we customize our services based on your specific needs.
 Over the last 25 years, YPPS has been able to procure and provide top quality custom specialty items and more to the Yale community. With a dedication to quality, turnaround, and cost, our Promotional Items & Solutions department has partnered with local Yale-approved vendors to produce all of our products. We take pride in knowing that we can facilitate these projects with great service and quality.
 YPPS is now an FSC certified vendor. The Forest Stewardship Council™ (FSC) is an international not for-profit, multi-stakeholder organization established in 1993 to promote responsible management of the world’s forests. One of its main tools for achieving this is independent certification and labeling of forest products, which offers customers the ability to choose products from socially and environmentally responsible forestry.
 YPPS is dedicated to supporting the University’s evolving media needs both educational and administrative with excellent customer support, resourceful solutions and indispensable services.
How to Configure a PaperCut Print Queue on a Mac
- You must be logged on to the Yale network with your netid.
- Find out the name of your printer and the print server it is on from YPPS or your DSP. (ex. paperc-prd-ps1.its.yale.edu/dept_printer)
- Go to the Apple symbol and select “System Preferences”. Then select “Printers and Scanners”
- ***Remove any print queues using SMB protocol***
- Click the + to add a new printer.
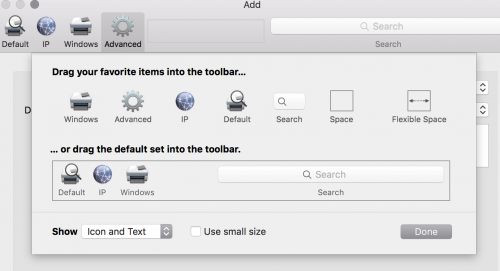
- Choose “Advanced” from the toolbar.
If you do not see the Advanced option on the toolbar: (* See Screenshot Below)
- Right-click and choose “Customize toolbar”
- Drag the Advanced icon to the toolbar - Enter the following settings:
- Type: ‘Internet Printing Protocol (ipps)’
- Device: ‘Another Device”
- URL: ipps://paperc-prd-psX.its.yale.edu:9164/printers/dept_printer
- Name: Dept Printer
- Use: ‘Generic PostScript Printer’ or desired model-specific driver - Click Add
- Check the ‘Duplex Printing Unit’ box for the Generic Postscript driver or other desired features related to your model.
Now, when you go to File > Print, you should see the Dept_printer printer. When you print, you will be asked to enter your NetID and password.
*****Please note, your first job sent to this printer will show ‘Hold for Authentication’. Refresh the queue and you will be prompted for your netid credentials and once they are stored in the keychain, you will not be prompted again. *****
(* #5 illustration)